We are well into spring now. Days are getting longer, trees are greening and flowers are blooming. I always find this influx of renewed energy quite contagious. It makes me want to start new projects – something “new” and fresh, something well… green of course. But I also know this surge of optimism (and over-confidence?) is usually short-lived. As the last lilacs begin to fade, so does my enthusiasm. So, let’s get to it before I surrender to a “less colourful” work routine.
There are countless options available to metalsmiths when it comes to metal patination, especially with copper and brass. In a previous post, I shared a few simple recipes for creating red patinas on copper. This time, I will focus on greens and blues. And like last time, I have chosen basic recipes that can be used easily in a small studio, with limited equipment and common household products (vinegar, ammonia and salt).
Metal preparation is key. The metal must be thoroughly cleaned (free of grease and oil) to ensure the proper action of the chemicals. Pumice works well, but scouring cleaning products like Ajax or Comet, for example, will do the job. Once the surface of the metal is clean, avoid touching it (hold by the edges or make a handle with fishing wire).
Copper is best suited for this type of patina, although brass, a copper alloy, will work up to a point with much less dramatic results. Silver is only superficially affected by this chemical reaction, so it can be used in combination with copper and provide some contrast. In the following example, the silver solder inlay stands out in a copper piece with a dark green patina.
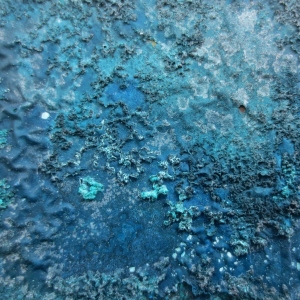
Spraying: The simplest method for producing a blue patina on copper is to spray ammonia on the surface of the metal, and let it dry outside in the sun for a few hours. If the metal has been textured, like in this photograph, the patina settles into the recesses of the texture and highlights the pattern. The cool blue patina is offset by the warm brown of the copper in the background.
To produce a wider range of greens and blues with a variety of surface treatments, two main methods can be used: the fuming method and the moistened method.
Fuming method: The metal is exposed to (not immersed in) the fumes of ammonia and/or vinegar. There are two options:
With Option A, you’ll need to drill small hole in the piece to suspend it in the jar with a fishing line (not metal wire). The piece can be re-cut later and filed to remove the hole. Allow at least 3 or 4 days or even more for the patina to develop, and to obtain richer tones.
Option B is more practical for coloring larger pieces or objects that can’t be suspended. As well, since the metal can be laid flat, it is possible to sprinkle salt on the surface. The action of the salt, combined with the fuming, creates patterns that add more interest to the coloring.

OPTION A: The metal is suspended in a glass jar by a fishing line, without touching the liquid at the bottom of the container. The jar is tightly sealed.

OPTION B: The metal is set beside a small container filled with ammonia, and placed in a larger tightly sealed glass container.
Moistened method: With the moistened method, the metal is buried in moist medium.

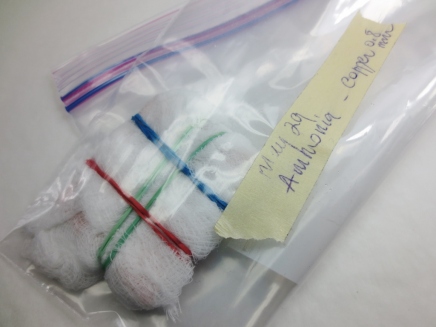
Metal wrapped in cheesecloth moistened with ammonia and tied with elastic bands, in a sealed plastic bag.
This truly fun technique allows the different mediums, moistened with ammonia or vinegar, to leave their own distinctive marks on the surface of the metal – this “etched” texture adds depth to the patina. The only drawback is the length of time it takes to achieve a rich colour, usually several days, a week or even longer. During this time it is important not to handle the piece, which would interfere with the process. But your patience will be rewarded!
Wrapping cheesecloth around the metal and attaching it with elastic bands creates a simple tie dye pattern:
Cheesecloth, dried grasses, tobacco leaves, tea, wood shavings, cat litter (clay granules, wood or paper pellets – without additives), etc… each material will create a different “etched” pattern and rich shades of green or blue. Try experimenting with several mediums. The possibilities are endless, as long as the material is dry and absorbent enough, and untreated. For better results, the key is not to add too much liquid to the medium; it should be moist, not wet.
Generally, ammonia tends to produce more blues, vinegar, more greens, but results are not always easy to control as many variables can affect the outcome. The main factors: length of exposure, quantity of chemicals used, will make a difference, but there are other ones such as the type of medium, the shape of the object, the gauge of the metal used, the composition of the metal (for brass) and the temperature, that are not always easy to manage. Don’t forget to document your experiments. Keep samples and take detailed notes to be able to reproduce the colours you like.
Finishing: Pieces of jewellery with this type of patina should not be worn directly on the skin. Beeswax or a spray coating/fixative like Krylon can be used to seal and protect the surface of the coloured metal. Left unprotected, some of these patinas will continue to evolve:
What I love about these techniques, beside the rich colours and painterly effects they offer, is that there is no right or wrong, as long as you keep your mind open to possibilities and happy accidents. Have fun with this, and who knows, this might help you sustain those boosts of spring energy and keep you motivated during the dog days of summer.
Recommended reading:
Patinas for Small Studios, by Charles Lewton-Brain, Brain Press, 2007.
Tips from the Jeweller’s Bench, http://www.ganoksin.org
And the recently published:
Patina – 300+ Coloration Effects for Jewelers & Metalsmiths, by Matthew Runfola, Quarto, 2014. (ISBN 978-1-62033-139-2)
This comprehensive guide on patinas explores in depth a large variety of coloration techniques, for different metals from steel to silver. It is very well organised, with detailed instructions and abundant colour samples.
I am very happy to add that two of my pieces have been included in this essential guide to patinas. Here is one of them:
Safety reminder: Store chemicals in tightly sealed, clearly labelled containers. Avoid breathing ammonia fumes, work in a well-ventilated area or outside. Wear gloves and eye protection. NEVER mix ammonia and bleach (the vapors produced are extremely dangerous!).


