

D.Bréchault. Bowl, copper, patina. Dia.: 9.5 cm
As I walk through the neighbourhood these days, I notice the first blushing trees. So many shades of red: burgundy, crimson, vermillion, even some magenta – and some rusty reds too. I enjoy these rich and vibrant colours and I always have the urge to run to my studio and add splashes of colours to my jewellery.

The palette of a metalsmith does not have to be limited to a few muted shades of silver and gold. Metals like copper, brass, and bronze lend themselves particularly well to a wide variety of colours (or patinas) and can open up all kinds of possibilities. Metal patination has been used in different parts of the world for a very long time. Years ago, Ayako Kuroki, a distinguished goldsmith and teacher from Tokyo, Japan, told me about hiirodo the red copper patina used in traditional Japanese metalwork. Here is an example of tsuba (sword guards) with a deep maroon red copper patina:
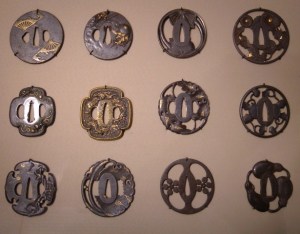
Tsubas (Asian Art Museum, San Francisco)
Photo : Wikipedia Commons
Several types of methods can be used to colour metal, depending on the colours you want to obtain – heat or chemicals, or a combination of both. For now, let’s deal with these rich and vibrant red autumn colours (I will talk about the greens, and the blues in another post). Here is how you can incorporate them into your work. Note that these recipes will only work with copper.
Remember to wear goggles, and make sure there is sufficient ventilation in your studio.
– Heat up the copper with the torch to a high temperature (until the metal is red hot).
– Quench immediately in a boiling water and salt solution (Salt/water solution: 3 tablespoons salt to 3 cups water).


This creates a deep brick red patina:

Depending on the intensity of the flame, or how long the metal is heated up, you’ll get darker shades of red or purplish red. If the metal is heated up for a bit longer, this can produce a marbled effect of red and black,

or a smoky effect like this:

Heating up the metal and quenching it in boiling water without salt will produce some rich tones of red as well, but generally more on the rusty or orangy side:

Here is another recipe:
First, coat the metal with a mixture of borax flux and water, and heat up with the torch. Quench in boiling water. Usually the more interesting colours appear on the back side of the sheet. Depending on what type of flux is used (borax cone ground, and mixed with water, or liquid flux like “Batterns”), you’ll get various results, from a deep burgundy with streaks of orange to a more mottled pattern:


And for a different mottled effect, try sprinkling salt on the metal as you are heating it up. Keep the flame on only until the grains of salt melt, then quench in boiling water right away. Results vary. On this sample, there are intricate patterns of purple and rose tones mixed with some smoky greys.

Sometimes, I like to texture the metal before coloring it; it adds more depth and another layer of interest to the design. There are many types of surface treatments available. In these examples, I used etching and roll-printing:


Important note: Don’t pickle your metal, as the pickling solution would remove the patina!
This heat patina is stable and fairly tough, so it does not really require much protection, especially if the patinated metal is in a recessed area that will prevent scratches. Otherwise a thin coat of soft beeswax will work well.
Now, if you consider yourself a control freak, these techniques are probably not for you! As with most patinas, results are not always consistent, and are difficult to predict, but that’s the beauty of it, and for me that’s the fun of it too. Factors such as the gauge of the metal, the intensity of the flame, or the temperature of the water will affect the results, so keep experimenting!

Absolutely stunning! I love working with copper because it is so versatile. I have never seen it go red like this before – this is by far the most beautiful example of how its colour can be altered.
Oh, thank you so much! And the colours on these pictures are really true to the original samples (I used a Daylight light bulb) – no Photoshop involved! Some of my students tried the technique recently – with beautiful results (great job, Sharon and Tricia!). I hope you try it too. Let me know.
Pingback: Going Green (and Blue) | metal+mettle
Hi, I love this technique! I want to make a bracelet for my brother who’s a big fan of The Flash from the comic books, his colors are red and gold, so I have a question for you. If I solder brass onto copper then try one of your recipes to make the copper red will it also turn the brass red, cause I want to keep the brass gold?
It will oxidise the brass but you should be able to sand it and polish it to return it to its original gold finish. Have fun with your project and let me know how it turns out. Thank you so much for your interest and for your comments!
Thank you so much!
Thank you so much for sharing the detail of ‘how to’ for all the patinas ! I know there are books, but you kept it simple, just what I like.
Thank you for your kind comment. I am glad you enjoyed my post. If you experiment with these (fun) techniques, please let me know!
Hi, thanks for sharing your techniques. I am trying to get a pinky red patina on cast copper at the moment but am having some trouble. I did some tests on much thinner, sheet metal by heating the metal up and dipping it in boiling water and got a great result but am now struggling with the cast ring.
The ring is 8mm thick but I have been using a big torch on a hearth so I think its getting hot enough but the best I can get is a red/black/brown patina. Do you have any tips for patinating cast copper?
Thank you for dropping by! I am not sure I can help – it looks as if it is not getting hot enough (the ring being quite thick). Try adding some coarse salt to the water. Good luck with it!