Tag Archives: how-to

Shop Secrets Revealed – #1 Masking Tape

Copy of DSCF7250

In life, as in jewellery making, there are things that you can’t always learn from books or from taking a class; practical things like how to remove a broken drill bit stuck in a piece of metal, shortcuts to help you work more efficiently, time-saving tips, and tricks of the trade. These are things you learn from other people; people who have a lot of experience in the trade, people in the trenches. Of course, you could also find out these things eventually through trial and error – well, error, mostly.

Something I wish I could ask all the goldsmiths out there is: What are your favorite tools or pieces of equipment and why? There is a lot to be learned that way, and not just in relationship to their work, but about new and better ways of using these tools as well.

This is the first of a series of posts where I’ll be sharing my favourite tools and tips with you, and I look forward to hearing from all of you as well. What are your favourite tools, and what “life-saving” tips do you know that you could share?

High on my list of the must-have tools in the studio is masking tape. I have several rolls in different parts of my studio placed in strategic places. There is a roll on my bench, always within easy reach. Masking tape has gotten me out of several tricky “sticky” situations and has saved me a lot of time and frustration.

Something masking tape is good for, of course, is … masking.

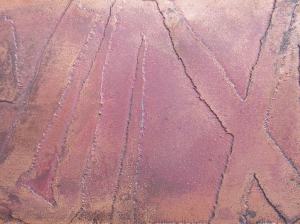
In preparation for etching, cover the parts of your design that you want to “keep”; masking tape acts as “resist” and protects the metal from being eaten away by the chemicals. This works well when etching copper or brass with ferric chloride.

D Brechault 7280

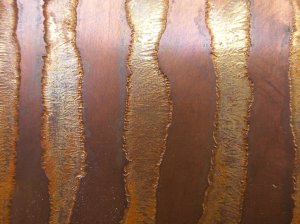
On the finished piece, the areas that were covered with masking tape are smooth and slightly raised; all the recessed areas of the design have been etched. They show a beautiful texture, especially around the edges of the masked parts.

D Brechault 7273

Etched copper with patina.

Pieces of tape can be torn by hand or specific shapes can be cut out with scissors. You can see here how this produces different results. With torn pieces of tape, there is a more pronounced texture (“pull lines”) around the edges, whereas with the cut pieces, the etch is cleaner and sharper around the shapes.

More pronounced texture, with "pull lines".

More pronounced texture, with “pull lines”.

Cleaner, sharper lines around the edges.

Cleaner, sharper lines around the edges.

The same masking technique can be used for sandblasting as well. After finishing and polishing your piece, cover the parts of your design that need to remain smooth and polished. Whatever is left exposed will have a lightly textured and matte surface after sandblasting. For heavy sandblasting, duct tape or electrical tape might be more suitable, but I find that masking tape is sufficient for standard results.

The exposed areas are textured; the masked areas remain untouched.

The exposed areas are textured; the masked areas remain untouched.

It’s great for covering or protecting various surfaces.

Since rivets are put in and set after a piece has been finished and polished, it helps to protect the area around the rivets to prevent damaging the surface of the metal when tapping them in with the riveting hammer.

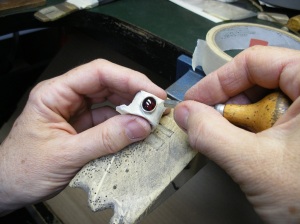
No matter how careful you are when setting a stone, accidents happen! To be safe and to protect your newly finished piece from scratches, cover with masking tape.

Setting a stone.

Setting a stone.

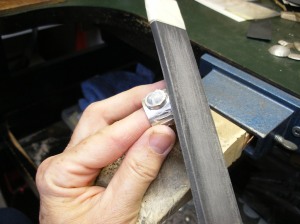
Cover a stone that’s already set, if you need to do some more cleaning around the setting.

Sanding around a setting.

Sanding around a setting.

You can use it to tape together a stack of sheets of metal.

This is useful when you need to drill through several sheets and make sure all the holes are perfectly lined up (for riveting for example).

Masking tape wrapped around 3 sheets of metal in preparation for drilling.

Masking tape wrapped around 3 sheets of metal in preparation for drilling.

Masking tape is quite sticky and can be used to make “handles”.

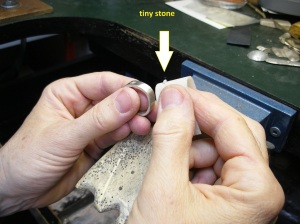
Use them to hold things that are very small, difficult to hold or slippery (like stones). With a “handle” it’s easier to put a stone in a setting, and take it out, to check whether it fits or it is level.

D Brechault  7257

To drill pearls. A pearl drilling vise is not really practical, because the pearl tends to slip out and worse, the tool can damage the delicate surface of the pearl.

Holding a pearl with a masking tape "handle" to drill it.

Holding a pearl with a masking tape “handle” to drill it.

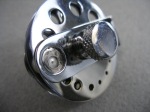
Pearl drilling vise.

Pearl drilling vise.

D Brechault 7285

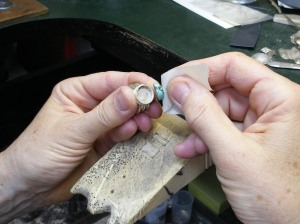
Life-saver. A piece of masking tape can be used to pull a stone out of a tight setting (works most of the time – more tips later on what to do when the stone is really stuck).

Pulling a stone out of a setting.

Pulling a stone out of a setting.

Finally…

Some people prefer duct tape. Yes, it is tougher and stickier, but I find that it tends to leave behind too much of a sticky residue once removed. Other people swear by green tape or painter’s tape. I find it not quite sticky enough and sometimes too flimsy.

To each her own.

Oh, and one more thing!

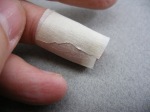
When a bandage is not available, guess what I reach for?

Copy of DSCF7287

Note: The idea for this blog post comes from Secret Shop Weapons, a book recently published by MJSA Press.

Zen and the art of sawing

My motorcycle, circa 1984

My motorcycle, circa 1984

This is a picture of my motorcycle, a Yamaha XS400, circa 1984. I bought it because I wanted to be free and feel the wind in my hair (and also, as an impoverished art student, I needed cheap transportation). But life took a different turn, as it sometimes does. In the end, I got more than what I bargained for, and learnt many valuable lessons. And what does this have to do with jewellery, you ask. You’ll find out soon.

The New Year has come and, with it, a new crop of students. One of the first basic metal techniques they need to know in order to make a piece of jewellery is sawing. And I keep hearing: Why are saw blades always breaking? Sounds familiar? Here are some tips that might help:

When inserting the saw blade, make sure there is sufficient tension in the frame. Pluck the saw blade to check the tension; if it does not “ping”, the blade is not taut enough.

Keep the frame perpendicular with your work piece.

When cutting on a curve, turn your work piece slowly (not the frame) while moving the saw frame up and down and without pushing.

When sawing, use the whole length of the blade, making long strokes, not short ones.

If these first tips have to do with knowing your tools and understanding the physics of sawing, the last two have to do with trust and balance – the key to learning to ride a motorcycle.

In order to get my motorcycle licence, I took a motorcycle training course. Our instructor gave us many tips, and the most helpful was to always anticipate, whether it is when scanning traffic to avoid obstacles or when negotiating a curve; “where you look is where you go”. As a novice rider, you tend to want to look down at your wheel. If you do, you hit the obstacle or you lose your balance and fall (and believe me, lifting a 400 lb bike was no mean feat for me!). Instead, look ahead. I would give the same advice to someone learning to use a jeweller’s saw: anticipate and look ahead of what you are cutting.

Copy of 0013_###

Our instructor would also often tell us that it was important “to look good” when riding a bike. Of course, he did not mean we had to wear stylish or cool motorcycle gear. What he was referring to was posture. Having a good posture means that you are not only comfortable, but also in full control of your bike and can operate it safely. The riding posture involves many things that are obviously not relevant to sawing, but surprisingly, some are. For example, relaxing your arms and holding the handle bars lightly. To a newbie, who is eager to learn, and maybe a bit impatient, gripping the frame with a white-knuckled hand and pushing forward with gusto, this will sound very counterproductive. The fact is, this kind of pressure only results in breaking more blades. Use your whole arm, not just your wrist, and remember, as I was explaining in the previous post “Ode to a bench pin”, to keep your back straight when working at your bench. Your work must be at mid-chest level.

And sawing may not be a high-risk activity like riding a motorcycle, but even still don’t forget to keep your fingers on the side or at the back of the blade – never in the front!

The title of this post is a play on Robert M. Pirsig’s Zen and the Art of Motorcycle Maintenance, An Inquiry into Values, first published in 1974. The title of his book was itself a play on Zen in the Art of Archery by Eugen Herrigel. R. Pirsig famously said that his book did not have much to do with Zen practice, or with motorcycles. It does, a bit; it relates a motorcycle journey during which the protagonists have extensive philosophical discussions on science, technology, and the meaning of quality. I reread it recently and found it even more moving and powerful than the first time. And this quest for quality is certainly much more relevant now, at the beginning of the 21st century. But enough of that; it will be the subject of another post.

Ode to a bench pin

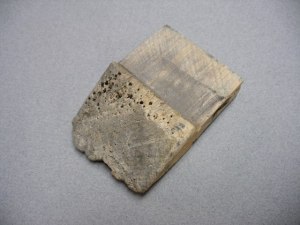
My bench pin is no more. Reduced to a mere stump, it has come to the end of its life and has to be replaced. Still, I find it hard to let go of it. I look at the scars left by the tools and I reminisce about the projects I have lived with these past years.

old bench pin

Old worn out bench pin

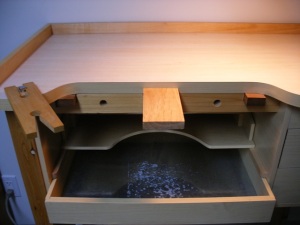
A bench pin is a small wedge-shaped wooden extension of the workbench and, as humble as it may look, it is a very important piece of equipment. In fact, as Michael David Sturlin notes in his excellent article “Bench Pin Basics” (in Art Jewelry Magazine. September 2012), for us goldsmiths, “… the bench pin is the center of our world”. And I would add that it might be the most personal piece of equipment as well. Let’s explore how one can develop a better relationship with it.

Workbench with bench pin (centre) and cutting board (left).

Workbench with bench pin (centre) and cutting board (left).

To help you work more comfortably, the bench pin should be placed at the right height. When you sit at your bench, facing the bench pin, your back should be straight and you should be able to keep your head up, with the pin at mid-chest level. And since we are on the subject of ergonomics, you should always be connected to your bench pin while you work – remember, it is the centre of your world. This means that your workpiece, your hand or your tool should always be in contact with the pin, whether you are sawing, drilling, forming or filing. This will ensure you work efficiently and safely. To quote M.D. Sturlin again, no “air jewelry” please! For that reason, the bench pin must be firmly secured to the bench. Pins come in different styles, but regardless, if your bench pin is wiggly, you won’t be able to work with maximum accuracy and control.

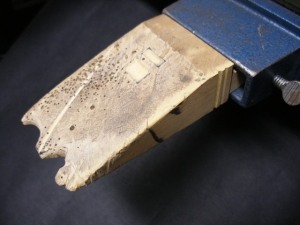
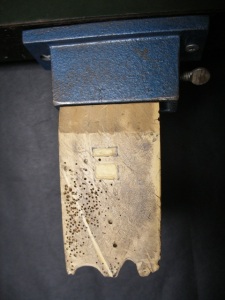
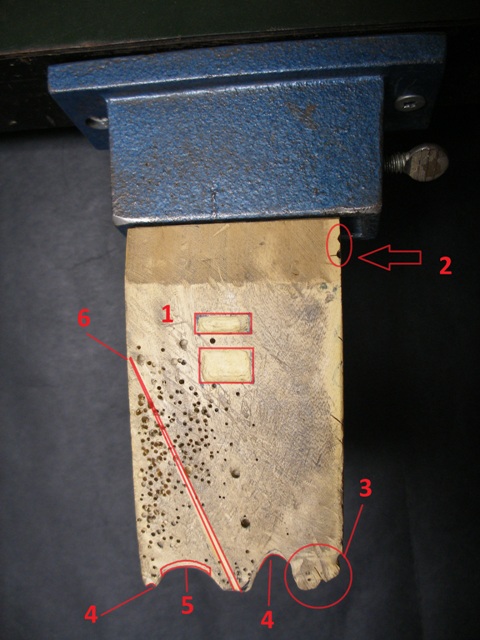
You are going to work with your bench pin for several years, so make it your own, and make it work for you. Don’t be afraid to carve and cut into it to modify it. Here is a diagram of the modifications I made to mine, but feel free to customize your own bench pin according to your needs (if you are left-handed, you might want to reverse the diagram).

Modified pin - side

Modified pin – side

Modified pin - front

Modified pin – front

modified pin with diagram

1Depressions: carve with round burrs; great for holding rings when filing inside the shank.

2Vertical grooves: clamp a board on the side of the pin, and drill holes of various diameters perpendicular to the top; good for filing the top of tubing sections.

3Nub: cut with a saw, and then file; good for holding a coil of wire while sawing the jump rings (push the coil onto the nub to stiffen it and secure it). Can also be used to cut a ring shank when sizing a ring – for that, slide ring over nub, and saw safely.

4Notch: saw first, and then file, carve one or several in different sizes. Great for forming (brace object in the notch).

5Slanted edge: useful for filing or when using a ring clamp (when setting a stone on a ring, for example).

6Tapered groove: for filing evenly the tapered end of a piece of round wire.

In addition to these, you could make a V-shaped cut for sawing. I prefer to use a separate cutting board for that, but it can be done on your bench pin as well. In that case, make sure you install the pin with the flat side up. For more suggestions, I recommend Tim McCreight and Charles Lewton-Brain, metalsmiths, teachers, and best-selling authors of way too many technical books to mention here, and of course, the Ganoksin Project (search in “bench tips”).

The beauty of the bench pin is in its simplicity; you can personalize it to your needs. Start with a few basic modifications, and then customize it further for your next project. It’s easy. Simply use a file, a saw or a burr and shape it as you like. As Rick said in Casablanca, “Louie, I think this is the beginning of a beautiful friendship.”

A blush of red in the studio

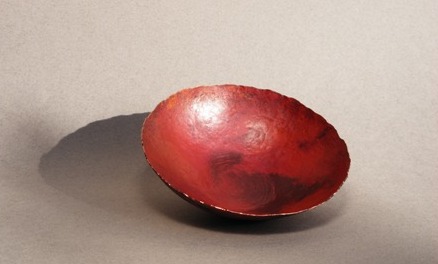
D.Bréchault. Bowl, copper, patina. Dia.: 9.5 cm

As I walk through the neighbourhood these days, I notice the first blushing trees. So many shades of red: burgundy, crimson, vermillion, even some magenta – and some rusty reds too. I enjoy these rich and vibrant colours and I always have the urge to run to my studio and add splashes of colours to my jewellery.

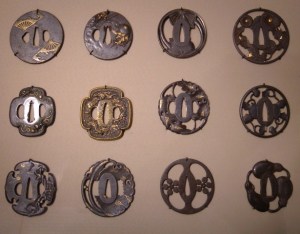
The palette of a metalsmith does not have to be limited to a few muted shades of silver and gold. Metals like copper, brass, and bronze lend themselves particularly well to a wide variety of colours (or patinas) and can open up all kinds of possibilities. Metal patination has been used in different parts of the world for a very long time. Years ago, Ayako Kuroki, a distinguished goldsmith and teacher from Tokyo, Japan, told me about hiirodo the red copper patina used in traditional Japanese metalwork. Here is an example of tsuba (sword guards) with a deep maroon red copper patina:

Tsubas (Asian Art Museum, San Francisco)Photo : Wikipedia Commons

Tsubas (Asian Art Museum, San Francisco)
Photo : Wikipedia Commons

Several types of methods can be used to colour metal, depending on the colours you want to obtain – heat or chemicals, or a combination of both. For now, let’s deal with these rich and vibrant red autumn colours (I will talk about the greens, and the blues in another post). Here is how you can incorporate them into your work. Note that these recipes will only work with copper.

Remember to wear goggles, and make sure there is sufficient ventilation in your studio.

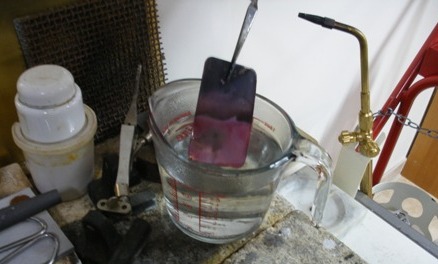
– Heat up the copper with the torch to a high temperature (until the metal is red hot).

– Quench immediately in a boiling water and salt solution (Salt/water solution: 3 tablespoons salt to 3 cups water).

This creates a deep brick red patina:

Depending on the intensity of the flame, or how long the metal is heated up, you’ll get darker shades of red or purplish red. If the metal is heated up for a bit longer, this can produce a marbled effect of red and black,

or a smoky effect like this:

Heating up the metal and quenching it in boiling water without salt will produce some rich tones of red as well, but generally more on the rusty or orangy side:

Here is another recipe:

First, coat the metal with a mixture of borax flux and water, and heat up with the torch. Quench in boiling water. Usually the more interesting colours appear on the back side of the sheet. Depending on what type of flux is used (borax cone ground, and mixed with water, or liquid flux like “Batterns”), you’ll get various results, from a deep burgundy with streaks of orange to a more mottled pattern:

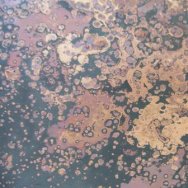
And for a different mottled effect, try sprinkling salt on the metal as you are heating it up. Keep the flame on only until the grains of salt melt, then quench in boiling water right away. Results vary. On this sample, there are intricate patterns of purple and rose tones mixed with some smoky greys.

Sometimes, I like to texture the metal before coloring it; it adds more depth and another layer of interest to the design. There are many types of surface treatments available. In these examples, I used etching and roll-printing:

Important note: Don’t pickle your metal, as the pickling solution would remove the patina!

This heat patina is stable and fairly tough, so it does not really require much protection, especially if the patinated metal is in a recessed area that will prevent scratches. Otherwise a thin coat of soft beeswax will work well.

Now, if you consider yourself a control freak, these techniques are probably not for you! As with most patinas, results are not always consistent, and are difficult to predict, but that’s the beauty of it, and for me that’s the fun of it too. Factors such as the gauge of the metal, the intensity of the flame, or the temperature of the water will affect the results, so keep experimenting!

Stuck for an idea?

Frottage is a useful technique for finding inspiration when you have “designer’s block”. I learnt about this technique when I was studying jewellery many years ago, and I have been sharing it with my own students ever since.

This technique was developed by the Surrealist painter Max Ernst in 1925. One day, tired of staring at his blank canvas, he was looking at the wooden floor and daydreaming, and the lines and the marks on the floor started morphing into various images. He decided then to lay sheets of paper on the floor and to rub (frottage comes from the French frotter – to rub) the paper over the textured surface with a pencil. From these, Ernst was inspired to create a series of drawings, called Histoire naturelle.

Max Ernst, from “Histoire Naturelle”, 1926.
MoMA, New York

Here is how I channel my inner Max Ernst:

I walk around my studio, or I go outside and “collect” textures. I just rub the surfaces through sheets of paper, randomly. The key is to work fast, without thinking too hard. It does not matter if the patterns overlap.

Rubbings can be found anywhere: on a concrete walkway, a crate, a brick wall, a metal grate, etc. Natural materials (i.e., leaves, bark, etc.) work well too. Tools, kitchen utensils, lettering, anything goes!

Here is my favourite pencil for this, a very fat and very soft pencil (6B):

I use the frottage technique in different ways. Sometimes, I simply look at the patterns on the sheet, until images emerge; this can serve as a point of departure for some ideas or sketches for future jewellery pieces.

Or, if I want to focus more specifically on textures or surface ornamentation – which I love to incorporate in my work – I pick out areas of the rubbings that appeal to me. Almost any pattern can be translated into metal, using various stamping tools, or techniques like etching, roll-printing, cuttlebone casting, etc. So I grab pieces of scrap metal, stamping tools, hammers, and start experimenting. Or some other times, I cut and paste various areas of the sheets and start assembling them to form necklaces, brooches, rings, whatever inspires me. You could also scan the sheets, and manipulate the shapes further with your computer. Again, the key it not to think too much or to worry about how it can actually be made.

This really works. Thank you Max Ernst! Start experimenting, and have fun. And you’ll probably come up with more ways of using the frottage technique.

D. Bréchault : Brooch “Poppies on the Meseta” – Silver, poppy jasper.
Textures made using various techniques: roll-printing, reticulation, stamping.