Tag Archives: copper

Action!


Jackson Pollock - photo by Hans Namuth

Jackson Pollock – photo by Hans Namuth

Lately I have felt the need to reconnect with less traditional techniques, and to be a bit more spontaneous in my approach. In my “side-gig” as an art history instructor in our Jewellery Programme, I had been looking at the work of the Abstract Expressionists, namely Jackson Pollock. The photographs and film of the painter shot by Hans Namuth in the early ‘50s show Pollock at work. In these iconic images, Pollock is seen moving about the large canvas laid on the floor, leaping and dripping or throwing paint right from the can. He appears to be totally immersed in the act of painting, an intense, gestural process; at some point, saying: “A painting has a life of its own; I let it live”. I watched this clip over and over again and knew that I wanted to work in a more instinctive manner, to respond to the metal as it moves and shifts, to be more engaged with it. I needed to put the “action” back into my work. I should also mention the paint-splattered shoes and the dangling cigarette, oooh, so cool. I wanted that too, or whatever the equivalent is for a goldsmith (minus the cigarette, of course).

Jackson Pollock - photo by Rudy Burckardt, 1950 - Smithonian Institution

Jackson Pollock – photo by Rudy Burckardt, 1950 – Smithonian Institution

Taking Pollock and the Action Painters, and their direct and immediate approach to painting as a point of departure, I decided to tackle a series of brooches (brooches, being less constraining and offering a larger “canvas” so to speak). I would riff on a few abstract shapes and create three-dimensional forms based on them. Copper, a very ductile and malleable metal, was the perfect candidate. It also lends itself well to patinas and will take on rich colours, sometimes even quite painterly.


Detail of patina on corrugated copper.

Detail of patina on corrugated copper.


Bonny Doon Engineering micro-fold brake #115090

Bonny Doon Engineering micro-fold brake #115090

Using corrugation and fold-forming, techniques that are fairly quick and hands-on, I was able to shape the sheets of metal rapidly, in a gestural and energetic manner. I recommend Patricia McAleer’s book Metal Corrugation, Surface Embellishment and Element Formation for the Metalsmith, 2002, Out of the Blue Studio (ISBN: 0-9715242-0-3), a very thorough and handy manual on corrugation. Fold-forming, a technique developed by Charles Lewton-Brain (several excellent publications available, see: Brain Press Publications) is a process that is both technical and playful, where the material is folded and unfolded repeatedly to form three-dimensional structures. Both techniques only require a few tools and simple equipment. For corrugation, I used the Bonny Doon Engineering micro-fold brake #115090 (available at riogrande.com). Fold-forming does not require any special equipment other than a rolling mill. Free tutorials are available on ganoksin.com.


D.Brechault, Crane No 6. copper, heat patina; corrugation, fold-forming

D.Brechault, Crane No. 6, brooch, copper, heat patina; corrugation, fold-forming


D. Brechault, Pod No 3, brooch, copper, heat patina; corrugation, fold-forming.

D. Brechault, Pod No. 3, brooch, copper, heat patina; corrugation, fold-forming.

D. Brechault, Zip No. 5, brooch, copper, heat patina,; corrugation, fold-forming.

D. Brechault, Zip No. 5, brooch, copper, heat patina; corrugation, fold-forming.

So, this is what I have been doing so far: These brooches are a sampling of a series of impromptu sketches or studies in metal. Rather than cleaning the metal by pickling it after annealing and soldering, I have left it in its natural state, oxidised, covered with a patina of warm, earthy colours. For me, this is a bit like Pollock’s paint-splattered shoes – evidence of the process of working the metal.

Rolling, folding, unfolding, shaping. Action!

Pollock's shoes - photo courtesy Pollock - Krasner House & Study Center.

Pollock’s shoes – photo courtesy Pollock – Krasner House & Study Center.

Acknowledgements: Thank you for your research, Andrew!


A blush of red in the studio

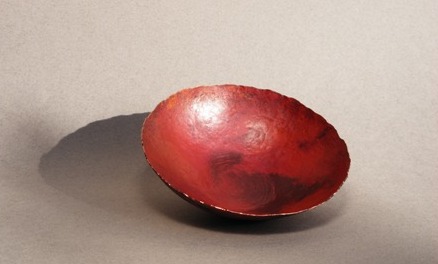
D.Bréchault. Bowl, copper, patina. Dia.: 9.5 cm

As I walk through the neighbourhood these days, I notice the first blushing trees. So many shades of red: burgundy, crimson, vermillion, even some magenta – and some rusty reds too. I enjoy these rich and vibrant colours and I always have the urge to run to my studio and add splashes of colours to my jewellery.

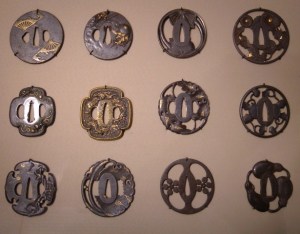
The palette of a metalsmith does not have to be limited to a few muted shades of silver and gold. Metals like copper, brass, and bronze lend themselves particularly well to a wide variety of colours (or patinas) and can open up all kinds of possibilities. Metal patination has been used in different parts of the world for a very long time. Years ago, Ayako Kuroki, a distinguished goldsmith and teacher from Tokyo, Japan, told me about hiirodo the red copper patina used in traditional Japanese metalwork. Here is an example of tsuba (sword guards) with a deep maroon red copper patina:

Tsubas (Asian Art Museum, San Francisco)Photo : Wikipedia Commons

Tsubas (Asian Art Museum, San Francisco)
Photo : Wikipedia Commons

Several types of methods can be used to colour metal, depending on the colours you want to obtain – heat or chemicals, or a combination of both. For now, let’s deal with these rich and vibrant red autumn colours (I will talk about the greens, and the blues in another post). Here is how you can incorporate them into your work. Note that these recipes will only work with copper.

Remember to wear goggles, and make sure there is sufficient ventilation in your studio.

– Heat up the copper with the torch to a high temperature (until the metal is red hot).

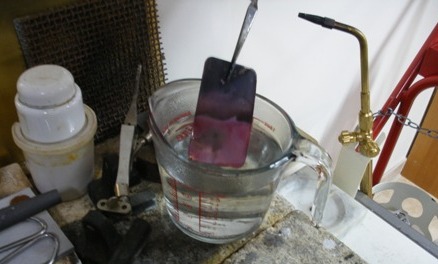
– Quench immediately in a boiling water and salt solution (Salt/water solution: 3 tablespoons salt to 3 cups water).

This creates a deep brick red patina:

Depending on the intensity of the flame, or how long the metal is heated up, you’ll get darker shades of red or purplish red. If the metal is heated up for a bit longer, this can produce a marbled effect of red and black,

or a smoky effect like this:

Heating up the metal and quenching it in boiling water without salt will produce some rich tones of red as well, but generally more on the rusty or orangy side:

Here is another recipe:

First, coat the metal with a mixture of borax flux and water, and heat up with the torch. Quench in boiling water. Usually the more interesting colours appear on the back side of the sheet. Depending on what type of flux is used (borax cone ground, and mixed with water, or liquid flux like “Batterns”), you’ll get various results, from a deep burgundy with streaks of orange to a more mottled pattern:

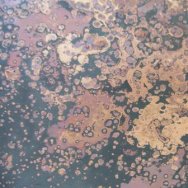
And for a different mottled effect, try sprinkling salt on the metal as you are heating it up. Keep the flame on only until the grains of salt melt, then quench in boiling water right away. Results vary. On this sample, there are intricate patterns of purple and rose tones mixed with some smoky greys.

Sometimes, I like to texture the metal before coloring it; it adds more depth and another layer of interest to the design. There are many types of surface treatments available. In these examples, I used etching and roll-printing:

Important note: Don’t pickle your metal, as the pickling solution would remove the patina!

This heat patina is stable and fairly tough, so it does not really require much protection, especially if the patinated metal is in a recessed area that will prevent scratches. Otherwise a thin coat of soft beeswax will work well.

Now, if you consider yourself a control freak, these techniques are probably not for you! As with most patinas, results are not always consistent, and are difficult to predict, but that’s the beauty of it, and for me that’s the fun of it too. Factors such as the gauge of the metal, the intensity of the flame, or the temperature of the water will affect the results, so keep experimenting!